Docker MacVLAN Networks
MacVLAN
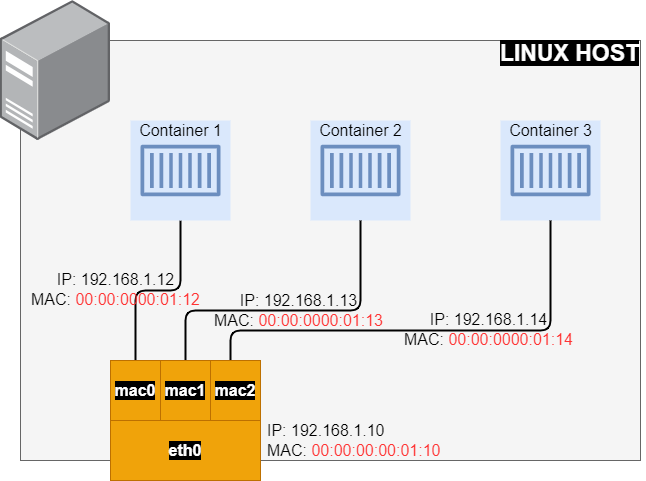
MacVLAN configures a sub-interfaces (also known as slave devices) of a parent physical Ethernet interface with its own unique MAC address and as a result with its own IP address. Applications, Virtual Machines and containers can now be grouped to a specific sub-interface, in order to connect directly to the physical network using their own MAC and IP Address.
mavvlan created unique MAC addresses to sub-interfaces. These can also be manually assigned.- Most NICs have a limitation on the number of MAC addresses. Sometimes exceeding that specific limit may affect the system’s performance.
- According to IEEE 802.11 protocol specifications, multiple MAC addresses on a single client are not allowed. Macvlan sub-interfaces will be blocked by the user’s wireless interface driver or AP.
Use MacVLAN networks
Legacy applications or applications which monitor network traffic, expect to be directly connected to the physical network. In this type of situation, use the macvlan network driver to assign a MAC address to each container’s virtual network interface, making it appear to be a physical network interface directly connected to the physical network. Need to designate a physical interface on your Docker host to use for the macvlan, as well as the subnet and gateway of the macvlan. Isolate macvlan networks using different physical network interfaces. Keep the following things in mind:
-
It is very easy to unintentionally damage network due to IP address exhaustion or to “VLAN spread”, which is a situation in which having an large number of unique MAC addresses in the network.
-
Networking equipment needs to be able to handle “promiscuous mode”, where one physical interface can be assigned multiple MAC addresses.
-
If application can work using a bridge on a single Docker host or overlay to communicate across multiple Docker hosts, these solutions may be better.
Create a MacVLAN network
When creating a macvlan network, it can either be in bridge mode or 802.1q trunk bridge mode.
-
In bridge mode,
macvlantraffic goes through a physical device on the host. -
In 802.1q trunk bridge mode, traffic goes through an 802.1q sub-interface which Docker creates on the fly. This allows to control routing and filtering at a more granular.
Bridge mode
To create a macvlan network which bridges with a given physical network interface, use --driver macvlan with the docker network create command. Need to specify the parent, which is the interface the traffic will physically go through on the Docker host.
docker network create -d macvlan \
 --subnet=172.16.86.0/24 \
 --gateway=172.16.86.1 \
 -o parent=eth0 pub_net
Need to exclude IP addresses from being used in the macvlan network, such as when a given IP address is already in use, use --aux-addresses:
 docker network create -d macvlan \
  --subnet=192.168.32.0/24 \
  --ip-range=192.168.32.128/25 \
  --gateway=192.168.32.254 \
  --aux-address="my-router=192.168.32.129" \
  -o parent=eth0 macnet32
802.1q trunk bridge mode
If specify a parent interface name with a dot included, such as eth0.50, Docker interprets that as a sub-interface of eth0 and creates the sub-interface automatically.
 docker network create -d macvlan \
    --subnet=192.168.50.0/24 \
    --gateway=192.168.50.1 \
    -o parent=eth0.50 macvlan50
Use an ipvlan instead of MacVLAN
In the above example, still using a L3 bridge. Use ipvlan instead, and get an L2 bridge. Specify -o ipvlan_mode=l2.
 docker network create -d ipvlan \
    --subnet=192.168.210.0/24 \
    --subnet=192.168.212.0/24 \
    --gateway=192.168.210.254 \
    --gateway=192.168.212.254 \
     -o ipvlan_mode=l2 -o parent=eth0 ipvlan210
Use IPv6
If configured the Docker daemon to allow IPv6, use dual-stack IPv4/IPv6 macvlan networks.
 docker network create -d macvlan \
    --subnet=192.168.216.0/24 --subnet=192.168.218.0/24 \
    --gateway=192.168.216.1 --gateway=192.168.218.1 \
    --subnet=2001:db8:abc8::/64 --gateway=2001:db8:abc8::10 \
     -o parent=eth0.218 \
     -o macvlan_mode=bridge macvlan216
Docker Compose Example
Making things a bit easier with a docker compose file. To illustrate the above, we will use a two Docker Containers.
The gateway can be only specified under version 2.
Create the docker-compose.yml file:
version: '2'

services:
  container1:
    image: alpine
    container_name: container1
    restart: unless-stopped
    tty: true
    networks:
      - db_net

  container2:
    image: alpine
    container_name: container2
    tty: true
    networks:
      - db_net

networks:
  db_net:
    driver: macvlan
    driver_opts:
      parent: eth0
    ipam:
      config:
      - subnet: 192.168.0.0/24
        gateway: 192.168.0.1
From within the directory Run: docker-compose up -d
Validate Containers Up
Showing command and output in the code samples.
Using Docker Inspect
Check the container process to see if two containers are up and running:
 docker ps --format \
> "table {{.ID}}\t{{.Status}}\t{{.Names}}"

CONTAINER ID   STATUS              NAMES
66c84b6688d6   Up About a minute   container1
ea6b160c7d6e   Up About a minute   container2
Check Docker networks:
docker network ls

NETWORK ID     NAME                 DRIVER    SCOPE
2d44dd74beb6   bridge               bridge    local
bd777dfcc50c   host                 host      local
fcf63e3315dc   macvlan_db_net       macvlan   local
156a09c3d2f5   none                 null      local
How to Get A Docker Container IP Address:
Using Docker Inspect on container ID 39ad7928071a
docker inspect -f '{{range .NetworkSettings.Networks}}{{.IPAddress}}{{end}}'

192.168.1.12
Using the Network ID fcf63e3315dc
docker network inspect -f \
'{{range .IPAM.Config}}{{.Subnet}}{{end}}' fcf63e3315dc

192.168.1.0/24
Look up each Container’s IP individually:
Based on the ipvlan_db_net Network ID fcf63e3315dc assuming jq is instaled.
docker network inspect -f \
'{{json .Containers}}' fcf63e3315dc | \
jq '.[] | .Name + ":" + .IPv4Address'

"container1:192.168.1.12/24"
"container2:192.168.1.13/24"
Look up each Container’s MAC individually:
docker network inspect -f \
'{{json .Containers}}' fcf63e3315dc | \
jq '.[] | .Name + ":" + .MacAddress'

"container1:02:42:c0:a8:00:02"
"container2:02:42:c0:a8:00:03"
Using Docker exec
In the following example we will work with container1.
Using the exec to run commands in a running container, but can execute an interactive sh shell on the container if want to execute additional commands.
docker exec -it container1 sh
From Docker host ping remote server.
docker exec container1 ping 192.168.1.20
Remote host capture packets tcpdump
tcpdump -e -ni eth0 icmp


tcpdump: verbose output suppressed, use -v or -vv for full protocol decode
listening on eth0, link-type EN10MB (Ethernet), capture size 262144 bytes

... TRUNCATED OUTPUT ...

03:36:24.792270 02:42:c0:a8:00:02 > 00:00:00:00:01:10, ethertype IPv4 (0x0800), length 98: 192.168.1.12 > 192.168.1.20: ICMP echo request, id 8, seq 0, length 64
03:36:24.792391 00:00:00:00:01:10 > 02:42:c0:a8:00:02, ethertype IPv4 (0x0800), length 98: 192.168.1.20 > 192.168.1.12: ICMP echo reply, id 8, seq 0, length 64

MAC from container: HWaddr 02:42:c0:a8:00:02
docker exec container1 ifconfig

eth0      Link encap:Ethernet  HWaddr 02:42:c0:a8:00:02
          inet addr:192.168.1.12  Bcast:192.168.1.255  Mask:255.255.255.0
... TRUNCATED OUTPUT ...
MAC from host: ether 00:00:00:00:01:10
 ifconfig eth0
eth0: flags=4163<UP,BROADCAST,RUNNING,MULTICAST>  mtu 1500
        inet 192.168.1.10  netmask 255.255.255.0  broadcast 192.168.1.255
        ether 00:00:00:00:01:10  txqueuelen 1000  (Ethernet)
... TRUNCATED OUTPUT ...
Assiging your own MAC address with the following mac_address: 00:00:00:00:01:11
... TRUNCATED OUTPUT ...

container1:
    image: alpine
    container_name: container1
    restart: unless-stopped
    tty: true
    mac_address: 00:00:00:00:01:11
    networks:
      - db_net
... TRUNCATED OUTPUT ...
Stop Containers
Remove containers and network with docker-compose down
Summary
This is a great way for legacy applications or applications which monitor network traffic, expect to be directly connected to the physical network.
Below are some considerations when using MacVLAN:
| PARAMETER | MacVLAN | ||
|---|---|---|---|
| Network Interface Compatibility | Common DHCP Server | ||
| Hardware Performance | Low CPU, Normal Network Utilization | ||
| Security | Meets 802.11 standards | ||
| Implementation | Easy to Set-Up | ||
Next in the Series:
Related Posts

2023 Phoenix VMUG UserCon
Introduction: The recent 2023 Phoenix VMUG UserCon brought together some like-minded people in the field, with discussions ranging from VMware technologies to best practices for optimizing existing systems.
Read more
Red Hat User Group Insights, Ansible Automation Platform, and ITSM Integration
Introduction: This blog post aims to summarize the key takeaways from this informative workshop. At the recent Red Hat User Group workshop on Red Hat Insights, Red Hat Ansible Automation Platform, and their integration with management (ITSM) systems, such as ServiceNow, provided valuable insights into how these technologies work together.
Read more
Robocopy Examples
Robocopy Examples Robocopy has many command line options and it can be overwhelming to know which commands to use. In this post, we will take a look at how to ues robocopy to copy, mirror, purge Files and Folders.
Read more