Hugo Static Blog Site Github
Hugo Setup with git
This blog content is generated with Hugo static site generator and integrated with GitHub Pages. This post will step cover publishing and pushing the newest content to GitHub Pages.
Suggested reading Getting Started with Hugo:
Learn more on GitHub. Complete documentation is available at Hugo Documentation.
Step 1. Create Repositories on GitHub
Assumptions already familiar with git commands and GitHub.
Create two repos
| Name | Access | Purpose | ||
|---|---|---|---|---|
blog |
public | Working local edits for changing adding content | ||
myblog.github.io |
public | Syncing output of public folder to github or web server | ||
GitHub Pages
There are two types of GitHub Pages:
- User/Organization Pages
https://<USERNAME|ORGANIZATION>.github.io/ - Project Pages
https://<USERNAME|ORGANIZATION>.github.io/<PROJECT>/
Step 2. Create New Site
With hugo command create new site blog and change into the directory:
hugo new site blog
cd to blog
Run initialize the directory as a git repository
git init

Initialized empty Git repository...
Add the github repository as a remote using git remote
Substitute <USERNAME> with your username.
git remote add origin https://github.com/<USERNAME>/blog.git
git fetch --all
git pull origin main
At this point need to choose a them to continue.
- Choose themes
Step 3. Installation theme
Using the mainroad theme.
From the project’s blog root directory, run:
git clone https://github.com/vimux/mainroad.git themes/mainroad
git submodule via the following command:git submodule add https://github.com/vimux/mainroad.git themes/mainroad
Edit config.toml
Specify mainroad as default theme in the config.toml file.
theme = "mainroad"
Change baseurl baseurl = "https://github.com/myblog-hub/myblog.github.io/" this is what will be pointing at the public part of the repo.
/ and also confirm baseurl is set to Project Pages https://<USERNAME|ORGANIZATION>.github.io/<PROJECT>/
If any problems when publishing tweak until works.Step 5. Preview site locally
From the project’s blog root directory, run:
hugo server

... TRUNCATED OUTPUT ...
Watching for config changes in C:\..\..\blog\myblog.github.io\config.toml
Web Server is available at http://localhost:1313/ (bind address 127.0.0.1)
... TRUNCATED OUTPUT ...
Open browser to http://localhost:1313
Step 4. Create New Posts
Syntax to create a new post: hugo new posts/POST_NAME.md
Create a post called mypost.md hugo new posts/mypost.md this creates a directory named posts
config.toml as might be reference as post.Step 5. Production repo setup
In production repo need to make sure have one commit and main branch if this was not already done through GitHub Page.
If README.md not added to remote repo then complete following or just add submodule
git clone https://github.com/<USERNAME>/myblog.github.io
cd myblog.github.io
git checkout -b main
add README.md
git add .
git commit -m "adding readme.md"
git push origin main
Add Submodule
From the project’s blog root directory add submodule, run:
git submodule add -b main https://github.com/<USERNAME>/myblog.github.io.git public
hugo server cammand, just delete the public folder it will get recreated.Step 6. Generate static files
Run with the theme used mainroad
hugo -t mainroad
Confirm public dir has been created.
.
├── archetypes
├── assets
├── config
├── config.toml
├── content
├── data
├── layouts
├── netlify.toml
├── **public**
├── resources
├── static
└── themes
Confirm remote repo has been added git remote -v:
git remote -v
origin  https://github.com/<USERNAME>/myblog.github.io.git (fetch)
origin  https://github.com/<USERNAME>/myblog.github.io.git (push)
Commit changes to production repo:
cd public
git add .
git commit -m "init commit"
git push origin main
Step 7. GitHub Pages
From the https://github.com/<USERNAME>/myblog.github.io.git Settings page check Pages section and make sure Branch main /root is selected.
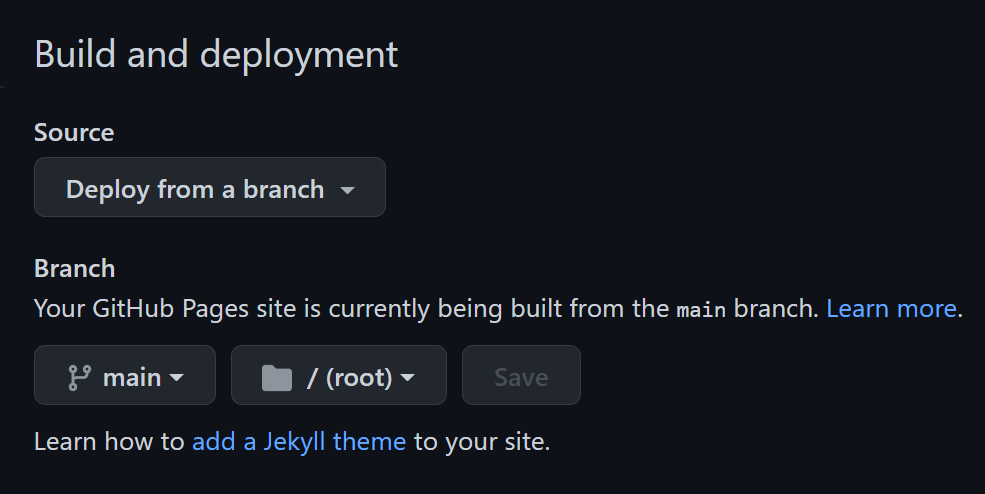
Check the actions page and can monitor the workflows deployment.
Ideas
- Hosting on Azure
- Azure storage static
- Azure Pipelines
- Azure Container Registry
- Azure Container Registry Tasks
- Hosting on AWS
- Cloudflare
Summary
The setup is great now website under full source control, build it anytime and host it literally anywhere. That’s not the end of the story!
Related Posts

2023 Phoenix VMUG UserCon
Introduction: The recent 2023 Phoenix VMUG UserCon brought together some like-minded people in the field, with discussions ranging from VMware technologies to best practices for optimizing existing systems.
Read more
Red Hat User Group Insights, Ansible Automation Platform, and ITSM Integration
Introduction: This blog post aims to summarize the key takeaways from this informative workshop. At the recent Red Hat User Group workshop on Red Hat Insights, Red Hat Ansible Automation Platform, and their integration with management (ITSM) systems, such as ServiceNow, provided valuable insights into how these technologies work together.
Read more
Robocopy Examples
Robocopy Examples Robocopy has many command line options and it can be overwhelming to know which commands to use. In this post, we will take a look at how to ues robocopy to copy, mirror, purge Files and Folders.
Read more